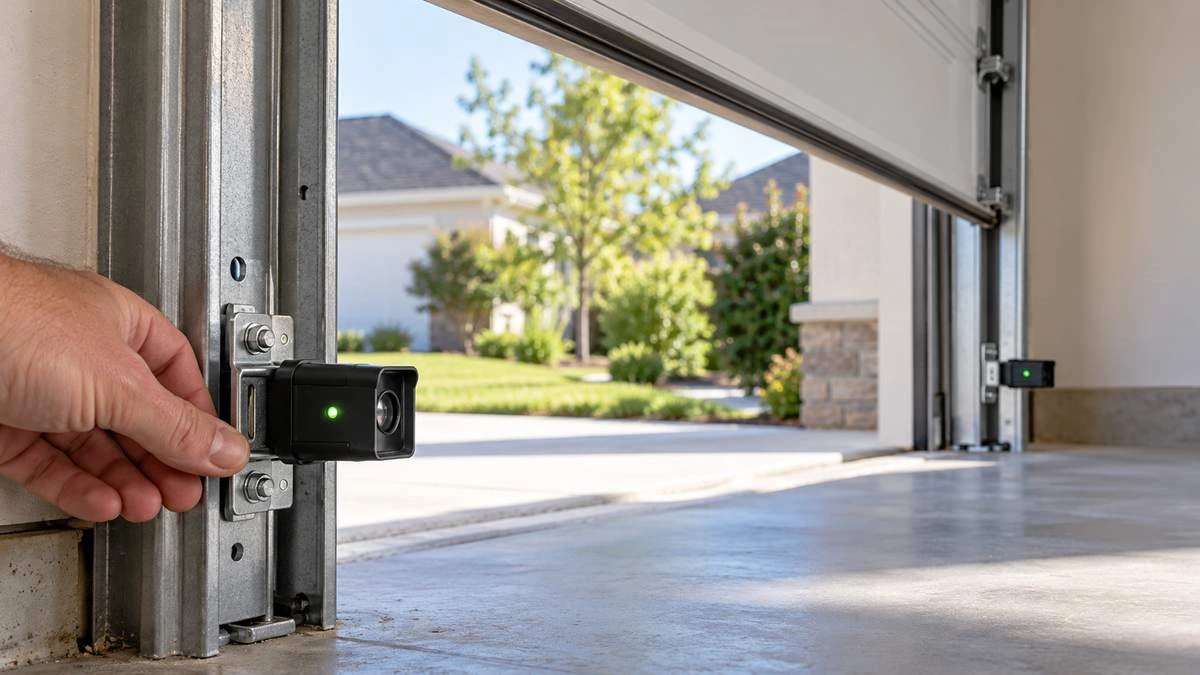
To fix garage door sensors, first clear the path between the two photo eyes and wipe their lenses. Check the indicator lights, then align the sensors until the lights show normal operation for your opener model. If the door still will not close, inspect the visible wiring and read the opener’s diagnostic code. Finish by testing the safety reversal system. Never bypass the sensors to make the door close.
Quick Diagnosis by Symptom
|
What you see
|
Likely issue
|
Next check
|
|
One sensor light blinks or goes out
|
Blocked beam or misalignment; sometimes wiring
|
Clear, clean, and align the sensors; then inspect the wires
|
|
Both sensor lights are off
|
Opener power or sensor wiring
|
Check power and visible connections
|
|
Both lights are steady, but the door reverses
|
A door or opener fault may be involved
|
Read the opener code and check for binding
|
|
The door fails only in direct sun
|
Sunlight may interfere with a receiver
|
Check the manufacturer’s approved shielding or positioning guidance
|
Indicator lights and fault codes differ by brand and model. Identify your opener before treating a color or blink pattern as a diagnosis. Chamberlain and Genie, for example, publish different model-specific sensor guidance. support.chamberlaingroup.com
Why Garage Door Sensors Stop Working
The photo eyes send an invisible beam across the opening near the floor. An object, dirt, or a bumped bracket can interrupt it. Loose or damaged wiring may make a sensor flicker or lose power. Strong sunlight can affect some receivers.
If the beam looks clear and both lights remain steady, the door’s reversal may have another cause. Do not replace the sensors based on the door’s movement alone.
How to Fix the Sensors Safely
1. Clear the Beam and Clean the Lenses
Open the door fully and keep children and pets clear. Move boxes, bikes, tools, leaves, and cobwebs away from the path between the sensors. Wipe both lenses gently with a soft, dry cloth. Try the door again from a position where you can see the opening.
2. Read the Lights and Align the Photo Eyes
Find the two sensors on opposite sides of the opening. Note which light is off or flickering. Follow your model’s manual and disconnect opener power before adjusting the brackets. Loosen the applicable bracket, point the lenses toward each other, and retighten it. Restore power to check that the lights remain steady; repeat the adjustment if necessary.
Do not raise the sensors to avoid a recurring obstruction. Mounting height must follow the opener instructions and applicable safety requirements. Chamberlain’s alignment instructions include a power-disconnection warning and require the sensors to face each other with steady indicator lights. support.chamberlaingroup.com
3. Check Power and Visible Wiring
If both lights are dark, first confirm that the opener has power. Unplug it before examining visible sensor wiring. Look for a loose terminal, a pinched cable, or damaged insulation. Do not cut wires or open the motor housing as part of this basic check.
Have a qualified technician investigate damaged wiring or a suspected failed sensor. Buy replacement photo eyes only after confirming compatibility with the opener model.
4. Check for Sunlight Interference
If the door fails only at a certain time of day, see whether direct sunlight reaches the receiving sensor. Use a shielding or positioning method approved for your opener, and keep the beam unobstructed. Genie identifies direct sunlight as a possible source of interference for some Safe-T-Beam receivers. support.geniecompany.com
If Both Sensor Lights Are Steady but the Door Still Reverses
Do not replace the photo eyes based on that symptom alone. Check the opener’s diagnostic display or manual, and look for an obvious obstacle, ice, or debris in the door’s travel path.
A binding, uneven, or unstable door needs professional service. Avoid adjusting force settings as a guess: an incorrect setting can affect safe reversal.
Test the Safety System After the Repair
With everyone clear and the opening in view, start closing the door and interrupt the photo-eye beam with an object from outside the door’s path. The door should stop and reverse.
Then perform the separate contact-reversal test exactly as your opener manual directs. If either test fails, stop using the automatic opener and arrange repair. The U.S. Consumer Product Safety Commission recommends inspecting the door and opener every 30 days. www.cpsc.gov
Risks and When to Call a Professional
Never tape the sensors together, disconnect them to force the door closed, or allow anyone under a moving door. Do not work on springs, lift cables, or bottom brackets; these parts can be dangerous.
Call a garage door professional if the door is unbalanced, binds, has damaged wiring, or fails a reversal test.
Frequently Asked Questions
Why is one garage door sensor light blinking?
A blinking light can mean an obstructed beam, misalignment, or a model-specific wiring fault. Clear and clean the path, then match the blink pattern to your opener manual.
Why are both garage door sensor lights off?
Check that the opener has power, then inspect visible connections with the power disconnected. Both lights being off is not, by itself, proof that both sensors have failed.
Why does the door reverse when both sensor lights are steady?
The photo eyes may be working normally. Check the opener diagnostic code and the door’s travel path; seek service if the door binds or fails its safety tests.
Can sunlight affect garage door sensors?
Yes, direct sunlight can interfere with some receiving sensors. Follow your manufacturer’s instructions for an approved shield or position change.
Planning a New Garage Door?
If you are designing a new garage or replacing the complete door, explore GEORGE’s customizable garage doors. Share your opening size, drawings, and design preferences to discuss the door configuration for your project.